主页 > 经验 >
win7网络连接图标不见了怎么解决
我们在上网的时候,桌面右下角会有一个网络连接图标,只要图标已经连上网络就可以上网了,不过有win7用户反馈打开电脑后发现网络连接图标不见了,那么怎么找回网络连接图标呢?下面就给大家分享win7网络连接图标不见了的解决方法。
找回网络连接图标方法:
1、首先点击开始菜单 - 打开控制面板,然后点击网络和Internet,接着点击“网络和共享中心”,然后再点击左侧的“更改适配器设置”,如下图所示:

2、随后在打开的网络连接窗口,双击“无线网络连接图标”,如下图所示:

3、然后会弹出“无线网络连接状态”窗口,点击“属性”,如下图所示:
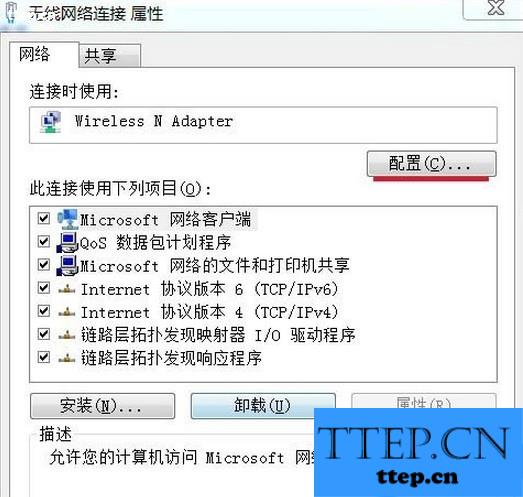
4、在弹出的无线网络连接属性窗口中,点击“配置”,如下图所示:
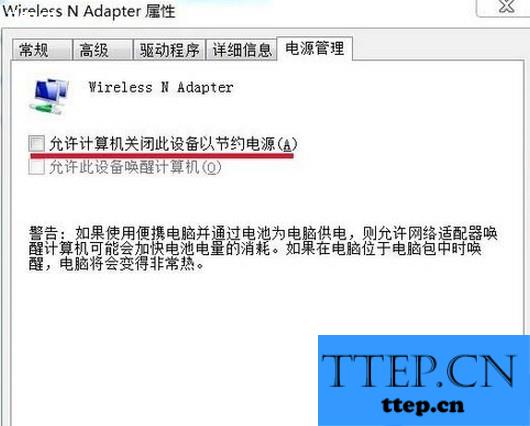
5、在弹出的Wireless N Adapter属性窗口,点击“电源管理”,去掉“允许计算机关闭此设备以节约电源”前面的勾,再点击确定,如下图所示:
以上就是win7网络连接图标不见了的解决方法,有需要的朋友可以试试上述方法,这样就可以帮你找回网络图标了。
找回网络连接图标方法:
1、首先点击开始菜单 - 打开控制面板,然后点击网络和Internet,接着点击“网络和共享中心”,然后再点击左侧的“更改适配器设置”,如下图所示:

2、随后在打开的网络连接窗口,双击“无线网络连接图标”,如下图所示:

3、然后会弹出“无线网络连接状态”窗口,点击“属性”,如下图所示:
4、在弹出的无线网络连接属性窗口中,点击“配置”,如下图所示:

5、在弹出的Wireless N Adapter属性窗口,点击“电源管理”,去掉“允许计算机关闭此设备以节约电源”前面的勾,再点击确定,如下图所示:

以上就是win7网络连接图标不见了的解决方法,有需要的朋友可以试试上述方法,这样就可以帮你找回网络图标了。
- 最近发表
- 赞助商链接