主页 > 经验 >
代理服务器如何使用 代理服务器使用教程
代理服务器如何使用 代理服务器使用教程 代理服务器使用教程
在百度搜索栏中输入“有代理”,单击第一个链接进入:

进入“有代理”官网后,可以看到很多类型的代理服务器,其中带有“HOT”图片的代理为当天经过验证且可用的免费代理服务器:

单击链接后可以看到有很多代理服务器,包括很多国外的代理服务器:

单击“设置”菜单下的“Internet选项”:

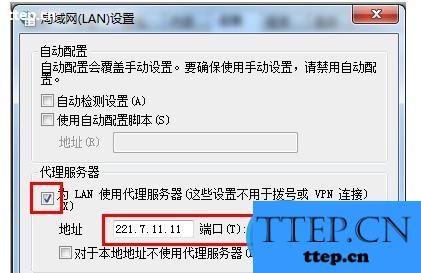
选择“连接”选项卡,单击下方的“局域网设置”:
勾选代理服务器,设置代理服务器“地址”和“端口”号后单击“确定”即可完成设置:
按快捷键“win+R”调出运行窗口,输入regedit后单击“确定”:

找到HKEY_CURRENT_USERSoftwareMicrosoftWindowsCurrentVersionInternet Settings文件夹,双击其中的“ProxyEnable”文件,将值修改为1后单击确定:

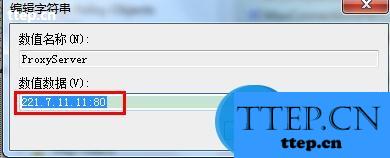
再双击“ProxyServer”,将值修改为“代理服务器:端口号”的格式后单击确定即可,比如“221.7.11.11:80”,如下图所示:

在百度搜索栏中输入“有代理”,单击第一个链接进入:

进入“有代理”官网后,可以看到很多类型的代理服务器,其中带有“HOT”图片的代理为当天经过验证且可用的免费代理服务器:

单击链接后可以看到有很多代理服务器,包括很多国外的代理服务器:

单击“设置”菜单下的“Internet选项”:

选择“连接”选项卡,单击下方的“局域网设置”:
勾选代理服务器,设置代理服务器“地址”和“端口”号后单击“确定”即可完成设置:

按快捷键“win+R”调出运行窗口,输入regedit后单击“确定”:

找到HKEY_CURRENT_USERSoftwareMicrosoftWindowsCurrentVersionInternet Settings文件夹,双击其中的“ProxyEnable”文件,将值修改为1后单击确定:

再双击“ProxyServer”,将值修改为“代理服务器:端口号”的格式后单击确定即可,比如“221.7.11.11:80”,如下图所示:


- 最近发表
- 赞助商链接