主页 > 经验 >
怎么给图片加上红圈,红框,红箭头标重点等?
要对一张图片进行文字、画圈圈、简单涂鸦……有好的工具可以使用吗,答案是有的,下面小编就为大家详细介绍一下,一起来看看吧
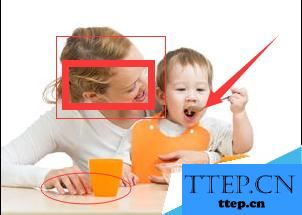
许多人看到别人在图片上用红圈,红框,红箭头标重点,觉得非常有用,可是自己又不知道怎么操作,其实方法很简单的,下面小编就为大家详细介绍一下,一起来看看吧!
方法/步骤
1、首先把自己的qq登上,然后截下要处理的图片(从任何地方截的图都可以)。

2、在截好图后,出现了四格方框,先不要保存图片,在截图框的左下角出现了一排工具。点击方框就为画方框,颜色自己选。点击圆形就是画椭圆。前面有三个小点是选择线条的粗细。
3、点击箭头就是画箭头标识。颜色任选。前面有三个小点是选择线条的粗细。

4、点击刷子,就是涂鸦,把隐私涂去,颜色也是任选。前面有三个小点是选择线条的粗细。

5、点击四格小方框就是打马赛克。可以调节马赛克的模糊度。

6、做好了自己的图片,然后点击保存图标就可以了。
以上就是怎么给图片加上红圈,红框,红箭头标重点等方法介绍,操作很简单,大家是不是已经学会了呢?最好小编要提醒大家一定要记住点保存图标哦。
许多人看到别人在图片上用红圈,红框,红箭头标重点,觉得非常有用,可是自己又不知道怎么操作,其实方法很简单的,下面小编就为大家详细介绍一下,一起来看看吧!

方法/步骤
1、首先把自己的qq登上,然后截下要处理的图片(从任何地方截的图都可以)。

2、在截好图后,出现了四格方框,先不要保存图片,在截图框的左下角出现了一排工具。点击方框就为画方框,颜色自己选。点击圆形就是画椭圆。前面有三个小点是选择线条的粗细。


3、点击箭头就是画箭头标识。颜色任选。前面有三个小点是选择线条的粗细。

4、点击刷子,就是涂鸦,把隐私涂去,颜色也是任选。前面有三个小点是选择线条的粗细。

5、点击四格小方框就是打马赛克。可以调节马赛克的模糊度。

6、做好了自己的图片,然后点击保存图标就可以了。

以上就是怎么给图片加上红圈,红框,红箭头标重点等方法介绍,操作很简单,大家是不是已经学会了呢?最好小编要提醒大家一定要记住点保存图标哦。
- 最近发表
- 赞助商链接