主页 > 经验 >
电脑自动获取IP地址的设置方法(图文)
这篇文章主要介绍了电脑自动获取IP地址的设置方法,需要的朋友可以参考下
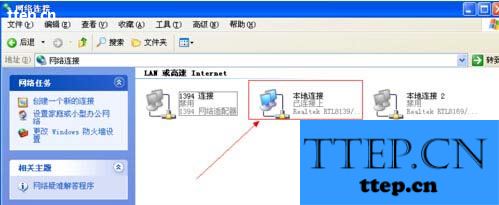
在我们使用电脑的过程中,有时候需要根据网络的需求将电脑IP地址设置为自动获取,对网络知识不太了解的朋友遇到此类问题可能不知道怎么去设置,在此小编总结了有关电脑设置自动获取IP地址的相关方法,感兴趣的朋友不妨了解一下。 由于用户所使用的windows系统不同,不同系统进入设置IP地址的方式也是不一样,在这里我们以现如今主流windows xp系统和windows 7系统为例,为大家详细讲解这两种系统下电脑自动获取IP地址的设置方法。 windows xp(XP系统)设置自动获取IP地址方法。 1、xp系统下右击电脑桌面“网上邻居”图标,选择“属性”,进入“网络连接”窗口。
2、在网络连接窗口中找到“本地连接”,右击选择“属性”。在本地连接属性“常规”选项卡中找到“Internet协议”,并双击进入“Internet协议”窗口。
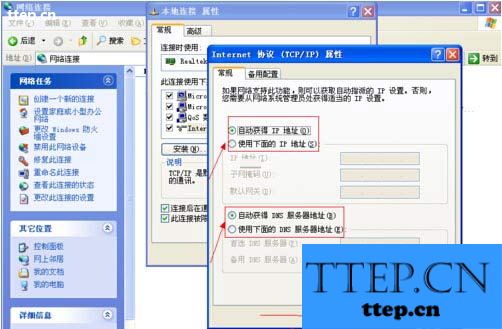
3、在“常规”选项卡中选择“自动获得IP地址”和“自动获得DNS服务器地址”。最后点击“确定”按钮。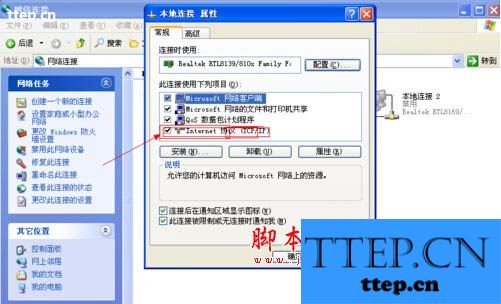
 windows 7 (Win7系统)设置自动获取IP地址方法。 1、在win7系统下找到电脑桌面上“网络”图标,右击选择“属性”(或右击电脑右下角任务栏中的“网络连接”状态图标,选择“打开网络和共享中心”),进入“网络和共享中心”窗口。点击左侧栏里“更改适配器设置”菜单。进入“网络连接”窗口。


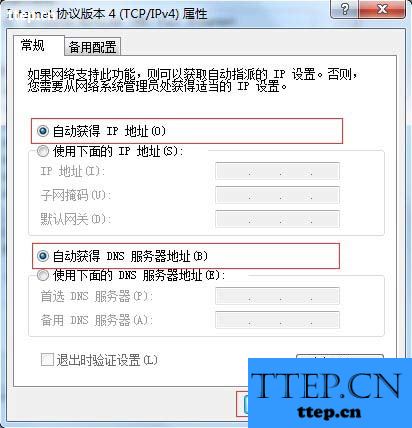
2、在网络连接窗口中,找到“本地连接”,右击本地连接图标选择“属性”。在本地连接属性“网络”选项卡中找到“Internet协议版本4”,并双击进入“Internet协议版本4”窗口。
3、在“常规”选项卡中选择“自动获得IP地址”和“自动获得DNS服务器地址”。最后点击“确定”按钮。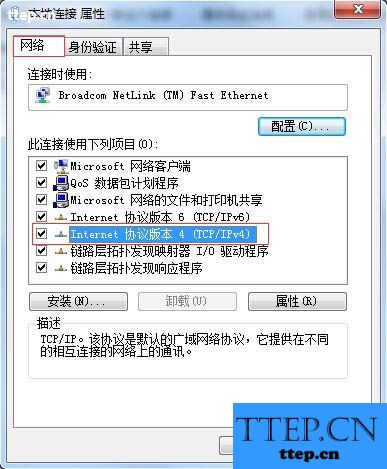
在我们使用电脑的过程中,有时候需要根据网络的需求将电脑IP地址设置为自动获取,对网络知识不太了解的朋友遇到此类问题可能不知道怎么去设置,在此小编总结了有关电脑设置自动获取IP地址的相关方法,感兴趣的朋友不妨了解一下。 由于用户所使用的windows系统不同,不同系统进入设置IP地址的方式也是不一样,在这里我们以现如今主流windows xp系统和windows 7系统为例,为大家详细讲解这两种系统下电脑自动获取IP地址的设置方法。 windows xp(XP系统)设置自动获取IP地址方法。 1、xp系统下右击电脑桌面“网上邻居”图标,选择“属性”,进入“网络连接”窗口。
2、在网络连接窗口中找到“本地连接”,右击选择“属性”。在本地连接属性“常规”选项卡中找到“Internet协议”,并双击进入“Internet协议”窗口。


3、在“常规”选项卡中选择“自动获得IP地址”和“自动获得DNS服务器地址”。最后点击“确定”按钮。

 windows 7 (Win7系统)设置自动获取IP地址方法。 1、在win7系统下找到电脑桌面上“网络”图标,右击选择“属性”(或右击电脑右下角任务栏中的“网络连接”状态图标,选择“打开网络和共享中心”),进入“网络和共享中心”窗口。点击左侧栏里“更改适配器设置”菜单。进入“网络连接”窗口。

2、在网络连接窗口中,找到“本地连接”,右击本地连接图标选择“属性”。在本地连接属性“网络”选项卡中找到“Internet协议版本4”,并双击进入“Internet协议版本4”窗口。

3、在“常规”选项卡中选择“自动获得IP地址”和“自动获得DNS服务器地址”。最后点击“确定”按钮。


- 最近发表
- 赞助商链接