主页 > 经验 >
怎么在WindowsXP系统电脑上录音 XP系统录音的方法图解
怎么在WindowsXP系统电脑上录音 XP系统录音的方法图解 在一些重要时刻或者重要会议上,我们需要使用到录音功能。不过很多用户并不知道在Windows系统中有一个自带的录音机功能,在不用下载其他录音软件的情况下,我们也可以使用电脑录音,下面就一起来看看在WindowsXP系统中录音的方法。
录音步骤:
1、首先要保证电脑具有麦克风设备,否则是无法录音的;

2、点击电脑左下角开始-所有程序-附件-娱乐-录音机;

3、点击红色的录音键;

4、可以看到默认的录音时长为60秒,这时是属于“空录”的过程,是为了积攒时间用的;

5、可以看到录音时长已经到了,这个时候继续点红色的录音键;

6、看,时长增加了60秒,变成了120秒;

7、如果你想要录制的声音还要长,就重复上述过程,“空录”完60秒之后,继续点录音键,直至攒够所需的时长;

8、假设需要录两分多钟,也就是需要180秒,现在已经攒够了,这时将时间滑块移到最开始的地方,也就是0秒的位置;


9、接下来就是正式录音的时候了,准备好你的麦克风,点击录音键;

10、当录完之后,点击黑色的停止键;

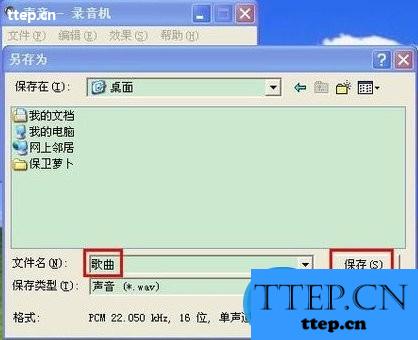
11、点击工具栏的文件-另存为;

12、选择要存放的地址,输入文件名,点击保存;
13、这就是刚刚录制好的文件了,很简单吧;

以上便是在WindowsXP系统中使用系统自带的录音机来录音的过程,如果你使用的是别的Windows系统,那么可以使用同样的方法来完成录音操作。虽然说系统自带的录音机跟现在市场上专业的录音工具有点差别,但是进行最简单的录音还是可以的。
录音步骤:
1、首先要保证电脑具有麦克风设备,否则是无法录音的;

2、点击电脑左下角开始-所有程序-附件-娱乐-录音机;

3、点击红色的录音键;

4、可以看到默认的录音时长为60秒,这时是属于“空录”的过程,是为了积攒时间用的;

5、可以看到录音时长已经到了,这个时候继续点红色的录音键;

6、看,时长增加了60秒,变成了120秒;

7、如果你想要录制的声音还要长,就重复上述过程,“空录”完60秒之后,继续点录音键,直至攒够所需的时长;

8、假设需要录两分多钟,也就是需要180秒,现在已经攒够了,这时将时间滑块移到最开始的地方,也就是0秒的位置;


9、接下来就是正式录音的时候了,准备好你的麦克风,点击录音键;

10、当录完之后,点击黑色的停止键;

11、点击工具栏的文件-另存为;

12、选择要存放的地址,输入文件名,点击保存;

13、这就是刚刚录制好的文件了,很简单吧;

以上便是在WindowsXP系统中使用系统自带的录音机来录音的过程,如果你使用的是别的Windows系统,那么可以使用同样的方法来完成录音操作。虽然说系统自带的录音机跟现在市场上专业的录音工具有点差别,但是进行最简单的录音还是可以的。
- 上一篇:三星C7开启热点分享网络方法
- 下一篇:《天天酷跑》熊猫剑客组合搭配推荐
- 最近发表
- 赞助商链接