主页 > 经验 >
电脑提示未识别的本地网络连接怎么办 Win7系统提示未识别的网络
电脑提示未识别的本地网络连接怎么办 Win7系统提示未识别的网络的解决办法。我们在使用电脑的时候,经常会遇到很多网络连接方面的问题。当我们的电脑提示未识别的本地网络连接,那么我们应该怎么办呢?一起来看看吧。
问题分析:出现这种情况往往和我们的网络设置有关系。
网卡驱动问题;
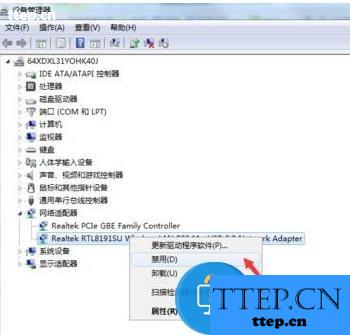
1、右键点击桌面的计算机图标,选择设备管理器,在设备管理器下方找到网络适配器选项。

2、打开网卡驱动列表,找到我们的当前网卡驱动右键点击,选择禁用,然后再点击启用。
更改适配器设置;
1、右键点击桌面网络,下拉菜单中找打属性选项,进入网络属性主界面。

2、然后我们在属性界面的左上方菜单栏中可以看到更改适配器设置选项,我们点击进入。

3、右键点击本地连接选项,选择属性,进入本地连接属性对话框。然后点击左下角的安装选项。

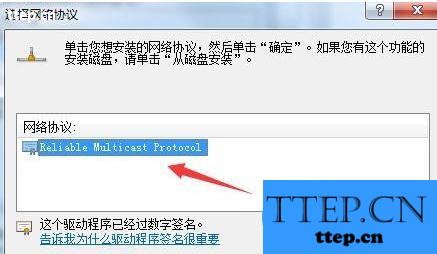
4、在弹出的选择网络功能类型对话框内,选择协议选项,点击下方的添加按钮进行添加。

5、点击添加之后,在弹出的网络协议对话框内选择,ReliableMulticast Protocol协议,然后点击确定即可。
启动服务项;
1、点击电脑左下角开始菜单找到运行选项,点击打开,在运行文本框内输入services.msc然后点击确定。

2、然后再服务列表中找到DNS和DHCP服务,点击在打开类型中选择自动,即可完成。

对于我们在遇到了电脑提示未识别的本地网络连接的时候,我们就可以利用到上面给你们介绍的解决方法进行处理,希望能够对你们有所帮助。
问题分析:出现这种情况往往和我们的网络设置有关系。
网卡驱动问题;
1、右键点击桌面的计算机图标,选择设备管理器,在设备管理器下方找到网络适配器选项。

2、打开网卡驱动列表,找到我们的当前网卡驱动右键点击,选择禁用,然后再点击启用。

更改适配器设置;
1、右键点击桌面网络,下拉菜单中找打属性选项,进入网络属性主界面。

2、然后我们在属性界面的左上方菜单栏中可以看到更改适配器设置选项,我们点击进入。

3、右键点击本地连接选项,选择属性,进入本地连接属性对话框。然后点击左下角的安装选项。

4、在弹出的选择网络功能类型对话框内,选择协议选项,点击下方的添加按钮进行添加。

5、点击添加之后,在弹出的网络协议对话框内选择,ReliableMulticast Protocol协议,然后点击确定即可。

启动服务项;
1、点击电脑左下角开始菜单找到运行选项,点击打开,在运行文本框内输入services.msc然后点击确定。

2、然后再服务列表中找到DNS和DHCP服务,点击在打开类型中选择自动,即可完成。

对于我们在遇到了电脑提示未识别的本地网络连接的时候,我们就可以利用到上面给你们介绍的解决方法进行处理,希望能够对你们有所帮助。
- 最近发表
- 赞助商链接