主页 > 经验 >
如何禁止程序联网 怎么禁止程序联网
如何禁止程序联网 怎么禁止程序联网。我们在上网的时候,网速是对于用户来说很重要的。但是在我们没有打开一些软件的情况下,它们也会自动的在后台运行。那么我们应该怎么去精致程序联网呢?一起来看看吧。
如何禁止程序联网
win7自大的防火墙功能强大,那么如何利用win7自带防火墙阻止程序联网,或者阻止各种广告弹窗的弹出呢?本教程是基于WIN7旗舰版的系统演示的。
步骤1:首先打开控制面板,找到系统与安全,如下图所示。

步骤2:打开系统与安全选项,得到如下图所示的对话框,这个比较熟悉了。

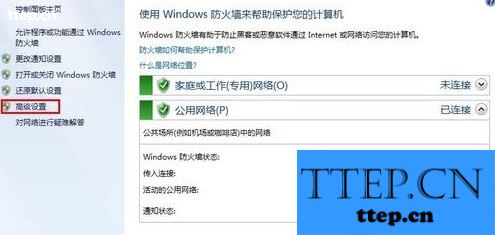
步骤3:点击左边的高级设置,如下图红框标示,出现高级安全windows防火墙设置。

步骤4:点击左边的出站规则,如上图所示,如上图红色框标注,弹出出站规则对话框如下图所示。
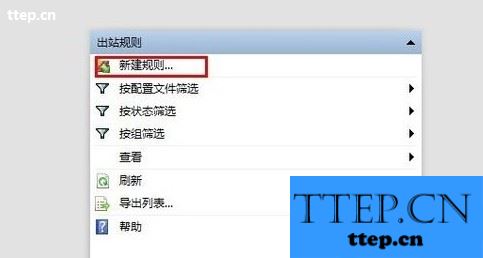
步骤5:点击新建规则,如上图红色框标注,弹出新建规则对话框,我们目标就是要阻止搜狐弹窗的弹出,所以我们选择程序。
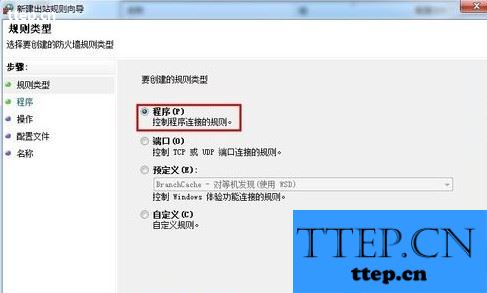
步骤6:点击下一步后弹出对话框,如下图所示。
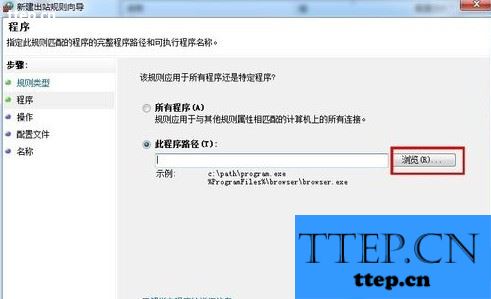
步骤7:点击浏览选项,在里面找到搜狐的程序,然后点击下一步。

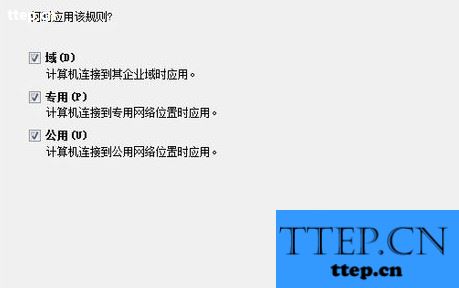
步骤8:弹出的对话框3个选项都勾上。
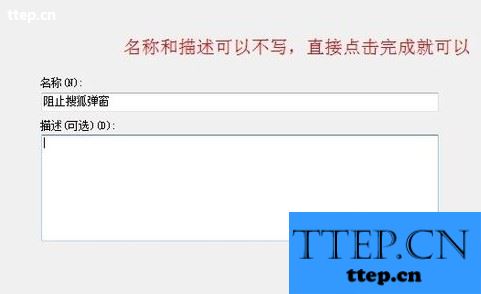
步骤9:再点击下一步,弹出的对话框,名称和描述可填写,也可以不填写,最好写上,容易看。
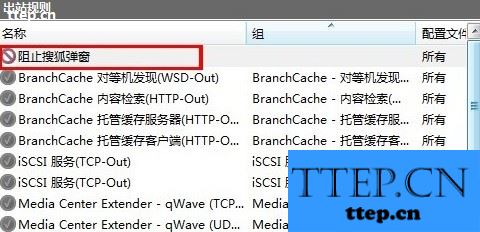
步骤9:最后点击完成,然后我们返回出站规则对话框,就能看到我们刚才阻止的那个程序已经显示上了,如下图所示。
禁止一些程序联网以后,我们再使用网络的时候就会通畅很多了,希望可以提高你的上网体验。
如何禁止程序联网
win7自大的防火墙功能强大,那么如何利用win7自带防火墙阻止程序联网,或者阻止各种广告弹窗的弹出呢?本教程是基于WIN7旗舰版的系统演示的。
步骤1:首先打开控制面板,找到系统与安全,如下图所示。

步骤2:打开系统与安全选项,得到如下图所示的对话框,这个比较熟悉了。

步骤3:点击左边的高级设置,如下图红框标示,出现高级安全windows防火墙设置。


步骤4:点击左边的出站规则,如上图所示,如上图红色框标注,弹出出站规则对话框如下图所示。

步骤5:点击新建规则,如上图红色框标注,弹出新建规则对话框,我们目标就是要阻止搜狐弹窗的弹出,所以我们选择程序。

步骤6:点击下一步后弹出对话框,如下图所示。

步骤7:点击浏览选项,在里面找到搜狐的程序,然后点击下一步。

步骤8:弹出的对话框3个选项都勾上。

步骤9:再点击下一步,弹出的对话框,名称和描述可填写,也可以不填写,最好写上,容易看。

步骤9:最后点击完成,然后我们返回出站规则对话框,就能看到我们刚才阻止的那个程序已经显示上了,如下图所示。

禁止一些程序联网以后,我们再使用网络的时候就会通畅很多了,希望可以提高你的上网体验。
- 最近发表
- 赞助商链接